Energy Efficient Housing Projects
This section was unusual in that it consisted of various different projects, all relating back to energy efficiency. Each other title on this page is one section. Since there is so much to cover, each project has a short description of the physics concept(s) we learned, and then another paragraph detailing our result.
Making a solar water heater
We learned that the an atom is composed of protons and neutrons in the nucleus, and electrons orbiting it. We also learned about thermal conductivity and resistance, but i'll go in to that in more detail in the next paragraph.
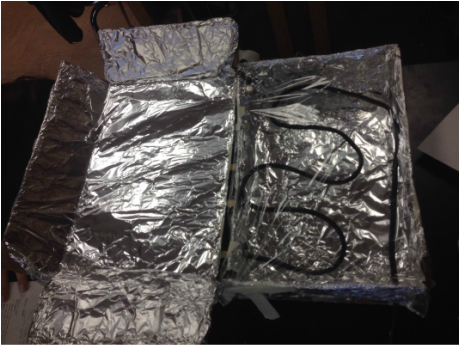
For our solar water heater, we used a small box (with plastic wrap stretched across it to stop evaporated water from getting out) as a base. We didn't use much in the way of insulation and high thermal resistance, butt instead decided to conduct as much heat as possible through our water. Our design worked by circulating water through a copper pipe (painted black to absorb as much heat as possible) to heat the water with the light's radiation. After the convection occurred in the copper tube, the water would pour out the other end into a cup that we periodically added to the top, circulating the water through the process again.
For our solar water heater, we used a small box (with plastic wrap stretched across it to stop evaporated water from getting out) as a base. We didn't use much in the way of insulation and high thermal resistance, butt instead decided to conduct as much heat as possible through our water. Our design worked by circulating water through a copper pipe (painted black to absorb as much heat as possible) to heat the water with the light's radiation. After the convection occurred in the copper tube, the water would pour out the other end into a cup that we periodically added to the top, circulating the water through the process again.
Designing a house to let in light
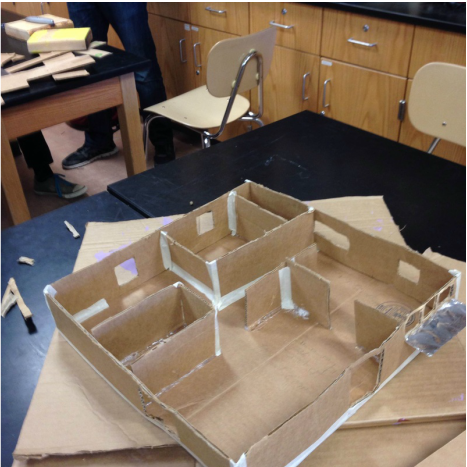
In the construction of our house, we used several different day lighting techniques. We used many skylights, which let in a lot of light, but are hard to clean. We also used solar tubes to let in light through the roof, as they disperse the light a lot more than skylights. Our solar tubes were problematic as they were difficult to model on a small scale, but we did the best we could with making an accurate simulation of them. On the far right of the picture below, you can see an exterior light shelf. Light shelves are used to bounce sunlight from outside onto the ceiling inside. Overall, we used many different windows and portals to let sun in to our house at any time of day.
Selecting a site for a passive solar home
(This project contained no new science content.)
While choosing a location to build a passive solar home, we investigated a flat, hilltop area overlooking the parking lot and the track, a grassy plain near the soccer and baseball fields, and a shady grove in the corner of the school, near the horse ranch, and judged them based n a variety of factors. These factors were then combined to create that site's total value. After judging the three sites based on noise level, open space, smell, temperature variations, accessibility, slope of the space, wind speed, soil toughness, and privacy, we determined that site 1, the grassy hill overlooking the track and the parking lot, was the best place to build a passive solar home.
While choosing a location to build a passive solar home, we investigated a flat, hilltop area overlooking the parking lot and the track, a grassy plain near the soccer and baseball fields, and a shady grove in the corner of the school, near the horse ranch, and judged them based n a variety of factors. These factors were then combined to create that site's total value. After judging the three sites based on noise level, open space, smell, temperature variations, accessibility, slope of the space, wind speed, soil toughness, and privacy, we determined that site 1, the grassy hill overlooking the track and the parking lot, was the best place to build a passive solar home.
Designing wind turbines
There are two main types of turbines: HAWTs (Horizontal Axis Wind Turbines) and VAWTs (Vertical Axis Wind Turbines). HAWTS are much more prominent, as they can absorb more energy, but VAWTs, according to everyone ever, look freaking amazing.
We made our HAWT have a saw tooth design on the front of each of it's 6 blades, because I had learned from a TED Talk that this is what whales have, and the saw pattern creates whorls of air (or water) behind it that increase the speed it can slip through the water at. Our VAWT was a standard three-pronged design.
(Quite a bit of the content for this section is in this google doc:
https://docs.google.com/a/students.nusd.org/document/d/1Fi7MNvRNCL_cYH0dUT2FlE2ALKomVBr3viF8fuISTmI/edit )
Inventing a cold frame / hydroponics hybrid
"Hydroponics" is a rather recent method of growing plants without the use of any dirt. It was created during the aftermath of the Great Dolphin Rebellion of 2033, in which the enslaved humans desperately attempted to invent a way to grow their crops on the newly flooded planet. Once it was discovered, they sent two things back in time as a warning to humanity: this method, and a deflated dolphin pool toy covered in bullet holes.
A "cold frame" is a smaller greenhouse structure designed to grow seeds. It is commonly used to grow seeds and weak plants during harsh winters, and is basically a special needs greenhouse.
For our coldframe design, we combined both of these methods of farming to create the HydroFrame. It utilizes the shape of a cold frame while having the interior of a hydroponics system.
Fixing the problem of the useless north window in the passive solar home
Again, we used a lot of the sun concepts from previous parts in the design of this.
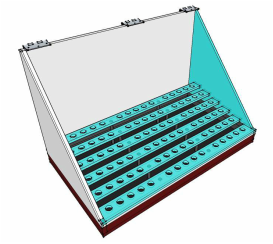
Our design was to have a mirror leaning against a post (seen in the picture below) at a 60 degree angle to let sun in though the window. We would also have white curtains over the window so the light sent in via the mirror wouldn't be so concentrated.
Our design was to have a mirror leaning against a post (seen in the picture below) at a 60 degree angle to let sun in though the window. We would also have white curtains over the window so the light sent in via the mirror wouldn't be so concentrated.

REFLECTION
Pits:
This was a LOOOOONNNNNGGGGG unit. There were a LOOOOOOOOOOOOOT of pits.
PIT 1: The ending of the solar water heater unit. Just as we were closing up for the day, to go write down our measurements, Kai accidentally spilled all the water from our tank (the part with almost half the water) onto the concrete. This meant we had to discount half of our warm water, meaning all our results for that project were ruined.
PIT 2: The north window. Having spent all our time on our HydroFrame design and presentation, we had to quickly crank out a script for our north window plan on the last day. Oh yeah, and nobody actually practiced reading the script before the presentation. Needless to say, it was pretty terrible.
Peaks:
Similarly, there was a huge amount of great moments too.
PEAK 1: The solar water heater's construction. During this time, I felt like I improved a lot in my leadership (though it is still something I need to work on). It was fun working together with my teammates on a clearly defined goal, and not having to argue constantly over every little detail about the design.
PEAK 2: Selecting a site for the passive solar home. The whole process of scouring the school for good locations, and then grading them on a scale was pretty fun. It was one of the few projects in this unit in which there were no major arguments or problems. We just got to go outside and explore the campus.
Improvements:
Even though I made significant progress during this unit, I could still definitely improve in my leadership skills. During the course of the unit, I attempted to be a voice of reason for all of Kai's crazy schemes, attempting to find potential problems with his plans or easier ways to do the same things, but all I ended up doing was adding to the problem by wasting precious time arguing. There is certainly something to be said about taking everything with a grain of salt, but I think I took it a little too far during this unit.
